Set the Table: Holiday Dinner

You may remember these photos from the Fall issue's Thanksgiving feature, but they're too pretty to not share again. If you are still figuring out how you want to style your table for your upcoming dinner party or even your Christmas gathering, use these simple ideas for inspiration!


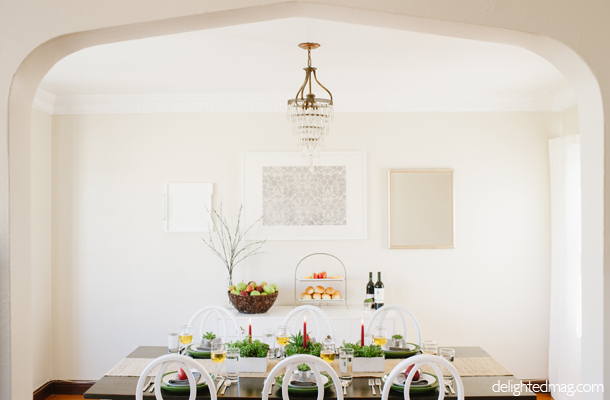
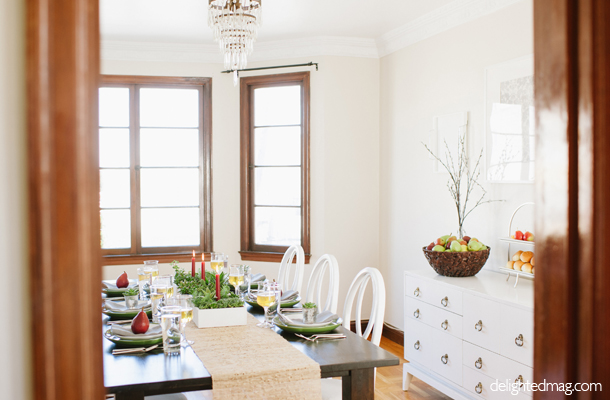
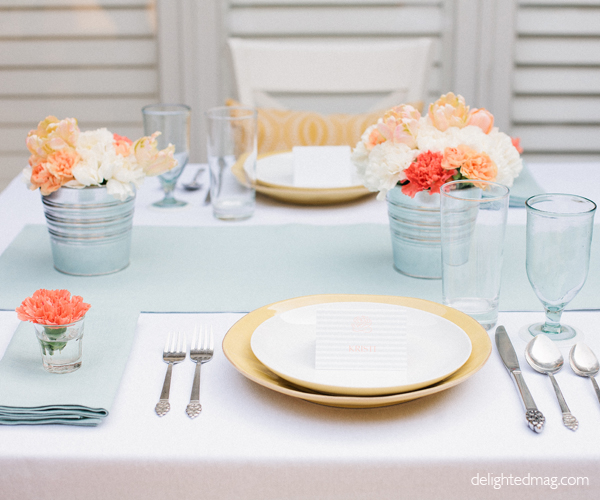
Simple and festive is the ideal way to decorate your table for any holiday gathering.  Here are my tips for setting your table with ease and beauty:

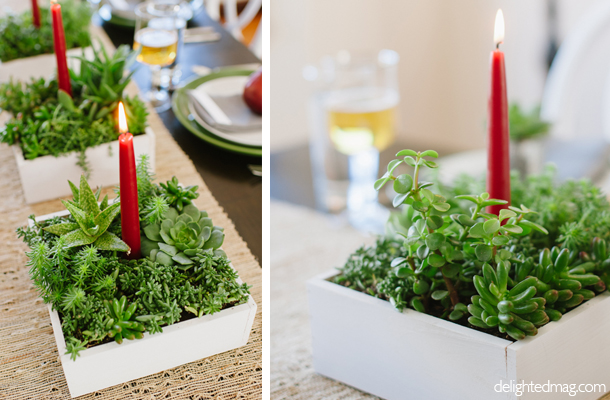
Live Plants  Succulents from your local home and garden center are fairly inexpensive and can be combined in any vase or container for an easy centerpiece. The varied shapes of these plants will provide a subtle element of interest to your table.

Candles You can’t go wrong with flickering light at any holiday gathering. Use tapers in a bold color or place a votive at each place setting to provide a sense of coziness.

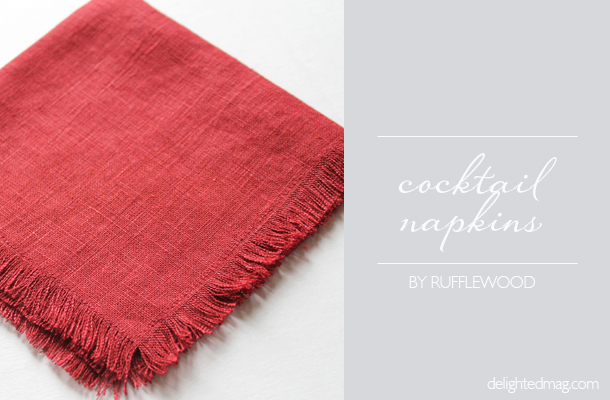
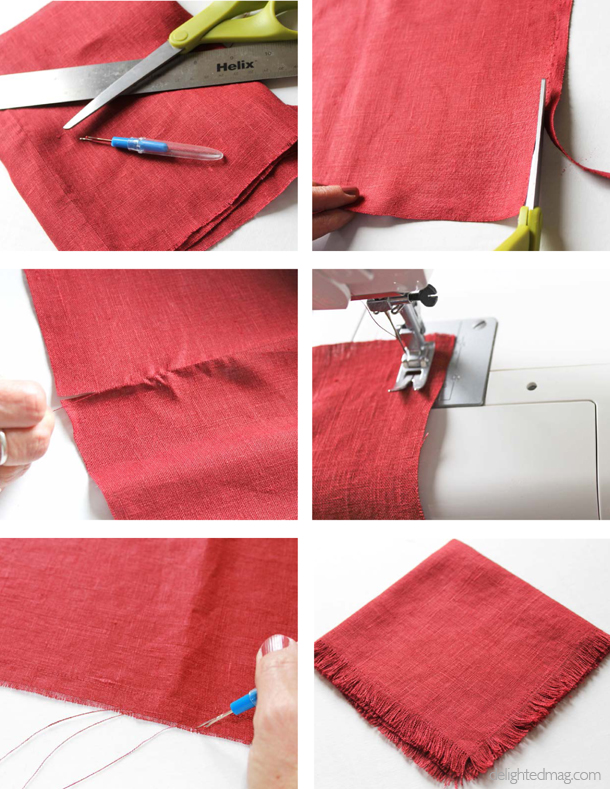
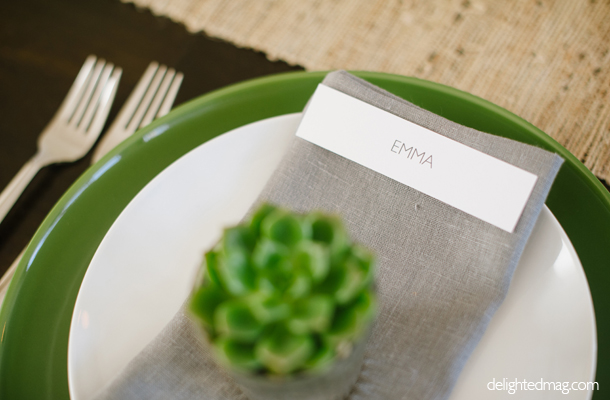
Linens An easy way to add color and texture to your table is with napkins and runners. Don’t be afraid to mix-and-match fabrics and colors. These shown are from Rufflewood and Pottery Barn.

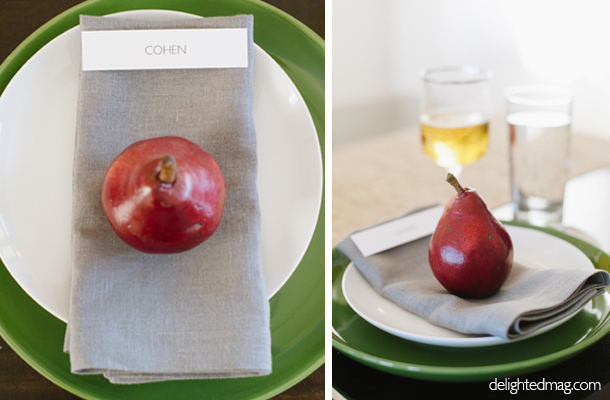
Place Setting Decor Use more than one item to create visual interest and add color (for instance, I alternated succulents and pears at each place setting).

Infinity chairs courtesy of Blueprint Studios.
Photos by the talented duo at Pictilio.

How To: Cocktail Napkins

The countdown for Christmas is going strong but there is still some time to make a few gifts! If you like to sew, why not try making these pretty linen cocktail napkins? Jan Gutierrez of Rufflewood gives easy instructions for making a set to give away...and you can always make a few extras to keep for yourself! See page 50 of Delighted's winter issue for the full feature.


MATERIALS
Fabric (a natural fiber such as cotton or linen is most absorbant)Sharp Fabric Scissors
Ruler or Tape Measure
Seam Ripper or Straight Pin


DIRECTIONS
First, cut the selvages off the edge of your fabric. Measure 11 inches from that edge and mark it. Then, to be sure your fabric is on the straight of grain, make a snip at that mark and separate one thread from the edge of that snip and gently pull till it is completely out of the fabric, creating a perfect cut line. Cut right on that line. If your fabric is not on the straight of grain, your fringe will be crooked and you’ll struggle later when you’re pulling away the threads.

Do the same on all four edges. Then sew a short-stitched narrow zigzag or decorative stitch all the way around, about 1/2-inch from the edge.

Gently pull one thread away at a time using a seam ripper or pin, until the zigzag prevents you from pulling any more. Repeat this process on all four sides. Iron it flat and smooth, and fold in half and in half again.

Roll napkins together, wrap with a ribbon and give!

Tutorial and Photos courtesy of Rufflewood.

Chai-Spiced Hot Chocolate

Yum! What is better on a cold day than a hot cup of cocoa? Megan Fleiner of the charming blog Passports and Pancakes shares a fun variation of the classic: Chai-Spiced Hot Chocolate with Vanilla Whipped Cream. Her feature in the winter issue can be found on page 66. Enjoy!

INGREDIENTS
For the hot chocolate:
1 cinnamon stick, plus extra for garnish
4 green cardamom pods
6 thin slices fresh ginger (skin removed)
1 star anise
4 whole cloves
6 whole black peppercorns
2 cups whole milk
1.6 ounces dark chocolate, roughly chopped
1.6 ounces milk chocolate, roughly chopped

For the whipped cream:
1 pint heavy whipping cream
1 tablespoon powdered sugar
1 tablespoon pure vanilla extract


DIRECTIONS
For the hot chocolate:
Add all ingredients except the chocolate to a small saucepan and bring to a boil. Reduce heat to a simmer and cook for 5 minutes, covered. Remove from heat and let steep for 10 minutes. Strain the milk into another saucepan or bowl and discard the spices. Heat the spiced milk over low-medium heat and add the chocolate. Stir continuously until the chocolate has melted completely (this should take about 5 minutes). Serve immediately, topped with vanilla whipped cream.

For the whipped cream:
Add all ingredients to a chilled mixing bowl. Whip with an electric mixer for 5-7
minutes until you have whipped cream. (This will make extra, so reserve what’s left for other holiday desserts!)

Recipe and Photos courtesy of Megan Fleiner, Passports and Pancakes


Pumpkin Goodness: Dutch Baby with Maple Butter

Although Halloween and Thanksgiving have come and gone, we can be thankful that pumpkin is still in abundance at any grocery store. If you haven't had a chance to make some of the delicious recipes from Delighted's fall issue, how about trying the Pumpkin Dutch Baby with Whipped Maple Butter by Clara Artschwager of the blog Channeling Contessa? It's perfect for a weekend brunch or even dessert!

INGREDIENTS
For the dutch baby:
1/2 cup cake flour (or all purpose)
1 1/2 tablespoons sugar
1/4 teaspoon salt
1/4 teaspoon dried ginger
1/2 teaspoon cinnamon
1/2 teaspoon nutmeg
1/2 tsp baking soda
2 eggs
1/3 cup puréed pumpkin
1/2 cup milk (2% or whole)
1 tablespoon butter, melted
1 tablespoon butter
1/2 tsp vanilla extract

extra maple syrup, slivered almonds, and powdered sugar for serving

For the whipped maple butter:
3 tablespoons softened butter (salted)
3 tablespoons pure maple syrup
1/2 tsp cinnamon

DIRECTIONS
Preheat the oven to 400°. Once heated, place a cast iron or heavy skillet in the oven to preheat while you prep the pancake batter.

Whisk together the pumpkin, eggs, milk, melted butter, and vanilla extract. Add in the flour, sugar, salt, spices, and baking soda and whisk until just combined.

Carefully remove the pre-heated pan from the oven. Place the remaining tablespoon butter in the pan and swirl around so it’s evenly coated. Pour the batter into the pan. Place back in oven and bake for 15-18 minutes until pancake is set and golden brown.

While the pancake is baking, make the maple butter. In a small bowl, whisk together the butter, maple syrup and cinnamon.

When the pancake is done, top with maple butter, slivered almonds, and more syrup or powdered sugar. Enjoy immediately!

Serves 1-2

Recipe and Photo Courtesy of Clara Artschwager of Channeling Contessa

Salted Caramel Hot Chocolate

Salted Caramel Hot Chocolate has to be one of my favorite holiday drinks. I discovered it during the winter of 2009, thanks to Starbucks and my cousin Tim. Today, I'm sharing a delicious recipe from Caroline of Coeur de La Photography. If you missed the "hot chocolate with a twist" recipes in the newest issue of Delighted, have a look on page 62.

INGREDIENTS

For the hot chocolate:
3 cups whole milk
4-6 tablespoons hot chocolate mix (I prefer Silly Cow Hot Chocolate)
2-3 tablespoons salted caramel sauce (Trader Joe's has a great one)

For the whipped cream: 
1-2 cups heavy whipping cream
3-4 tablespoons sugar
1-2 teaspoons vanilla

DIRECTIONS

For the hot chocolate:
Pour milk into a medium sized pot and lightly heat. Once warm, add chocolate mix. Add less or more to your liking. Whisk until chocolate is incorporated. Turn the heat up to medium and simmer until hot. Keep whisking. Do not overheat. Pour into your favorite mugs. For the salted caramel sauce, fill guests’ spoons with salted caramel and let them stir their hot chocolate with a caramel spoon. Dollop with homemade whipped cream and serve. Enjoy!!

For the whipped cream:
Add ingredients to a medium sized bowl and mix with an electric mixer for 5-10 minutes on high. Your mixture will begin to softly thicken. Do not overmix as the cream will become too thick and lose its sweetness. Once done, place into a mason jar and serve when ready.

Recipe and Photos courtesy of Caroline at Coeur de La Photography

Pumpkin Pie


October is in full-swing and that means many of us are starting to think about cooking with pumpkin! I had my first Pumpkin Spice Latte of the season a couple weekends ago and now that the air is cooler and the leaves are starting to fall, I'm looking forward to the smell of baked goods coming from the kitchen and seeing adorable orange and white pumpkins available at every grocery store. I just love fall!

Today I'm sharing Tim and Shanna Mallon's recipe for homemade pumpkin pie and crust...yum! Tim and Shanna's blog Food Loves Writing is a great place to visit for delicious looking recipes made with whole foods. Head on over to have a peek. And don't miss their pumpkin pie recipe feature in the fall issue of Delighted (pages 66-69).

INGREDIENTS
1 unbaked pie crust (see recipe below)
2 eggs
1 cup unrefined cane sugar (sucanat)
1 Tablespoon white spelt flour
2 cups pumpkin puree (usually about one whole pumpkin, roasted, scooped, and blended in a food processor)
1/2 teaspoon sea salt
1 teaspoon cinnamon
1/2 teaspoon ginger
1/2 teaspoon nutmeg
1/2 teaspoon allspice
12 ounces organic heavy cream

DIRECTIONS
Preheat oven to 450° F.
In a large bowl, beat two eggs lightly. Add the rest of the ingredients (sucanat, flour, pumpkin puree, salt, cinnamon, ginger, nutmeg, allspice, cream). Mix together well. Pour mixture into unbaked pie crust, leaving a little space at the top (I always have like 1/4 cup leftover, which I either bake in a tiny leftover pie crust or by itself in a small ramekin). Bake for 10 minutes at 450°; then lower the temperature to 350° F, and bake for 40 to 50 minutes more. The pie is done when a toothpick inserted in the center comes out clean.

INGREDIENTS - Pie Crust
1 cup white spelt flour
1/2 teaspoon salt
1/2 cup (1 stick) butter, chopped into small pieces
1/4 cup cold water

DIRECTIONS - Pie Crust
Combine flour and salt in a large bowl. Cut in butter with a pastry cutter or a fork until the mixture looks like coarse crumbs. Stir in water. Using your clean hands, shape the dough into a ball. It can be refrigerated for a few hours or overnight, as long as you thaw it for about 20 minutes before using.
Roll out your dough onto floured parchment paper, making it larger than the pie pan you want to set it in. Using the parchment to help you move it, turn the crust onto the pie pan, pressing it down and up the sides. Makes one pie crust.

Enjoy!!

Photos and Recipe by Tim and Shanna Mallon of the blog Food Loves Writing.
Food Loves Writing is a literary food blog about food and about everything else from Tim and Shanna Mallon of Nashville. Having first met through the blog in 2010, the couple now shares stories about their life together, eating whole foods, in their first years together as husband and wife.

Baby Shower

If you are planning to take advantage of the last few weeks of summer before moving your parties indoors, why not be inspired by some of Rufflewood's ideas for hosting a simple but classic garden event? Featured on pages 66-75 in our summer issue, the photos and free printable are a great place to start!

FRESH FLORAL ARRANGEMENTS
Find carnations, tulips, or any blooms with great texture at your local farmers market. Snip and arrange in a casual pail. We found ours at Ikea. Be sure to add enough water to last through a sunny day.

SIMPLE MENU
Open faced sandwiches, homemade cookies, a salad, and fresh fruit are perfect for a shower. Easy to prepare and always delicious.

REAL DISHES AND LINENS
Using real dishes, utensils and glassware will make your event feel more special. Use what you have in your cabinet or borrow from your mom or grandma for a nostalgic touch. Same goes for the tablecloths and linens. We found ours at Rufflewood. An added perk - real is more sustainable than paper or plastic!

PAPER DETAILS
Using cohesive paper elements will add an element of thoughtfulness to any event. From the invitation to the place cards, be sure your paper items work together to create the style you want. Use the free baby shower printable from Rufflewood.

Design by Rufflewood | Photos by Manus Chau Photography