Mother's Day Gift List

As a new mom I now have a deeper appreciation for my own dear mother. This Mother's Day I intend to let her know just how grateful I am for her by writing her a sweet note (which I have written in my mind!), and giving her a little something she will love. If you're still debating about what to get your mom, why not consider one of these pretty options?

Links: One | Two | Three | Four | Five | Six

And don't forget! You can still enter our Mother's Day Giveaway for a chance to win a bunch of fun gifts worth over $275. Good luck :)

Gardenia and succulent box

Tomorrow is May 1 (can you believe it?) and that means May Day! The old tradition of leaving flowers on a friend or neighbor's doorstep on May Day is a sweet one. Have you ever surprised someone with flowers? Here is a beautiful way to do so. Thank you to Kiana Underwood of Tulipina for the tutorial.

SUPPLIES
- A 9x9 (or smaller) wooden box layered with plastic insert to avoid leakage
- 5-6 floral water tubes
- Mini vases/vessels
- A pair of scissors
- Gardenias on the stem
- Succulents
- Geranium leaves and other greens of your choosing

 STEP 1
Begin by placing the mini vases inside the box and filling them with water, then fill them with the geranium leaves and your other greens.


STEPS 2 & 3
Place the succulents within the vases so that they are randomly and naturally distributed. Fill the floral water tubes with water and place the gardenias inside. Then add them to the box amongst the vases as space permits.


STEP 4
Ensure that the box is filled with flowers and greens in each corner as well as the center and that there are no remaining empty areas.


This box will be a beautiful piece to leave on a friend’s doorstep and should last about 7-10 days. The gardenias will smell lovely and the succulents can later be planted in soil and will continue to grow.


Kiana Underwood is the owner of Tulipina, a boutique floral design studio in San Francisco, California specializing in chic events. Kiana’s unique approach to design blends a natural and organic garden style with creative and eclectic design. She is also the editor of floral blog Naked Bouquet, which focuses on design and creative DIYs. When not designing, Kiana enjoys reading, playing the piano, and being a busy mother of three.
Follow Kiana: Blog | Twitter | Facebook

Photos by Heather Zweig

Mother's Day Giveaway!


I'm really excited about this Mother's Day giveaway collaboration with StyleSmaller and 
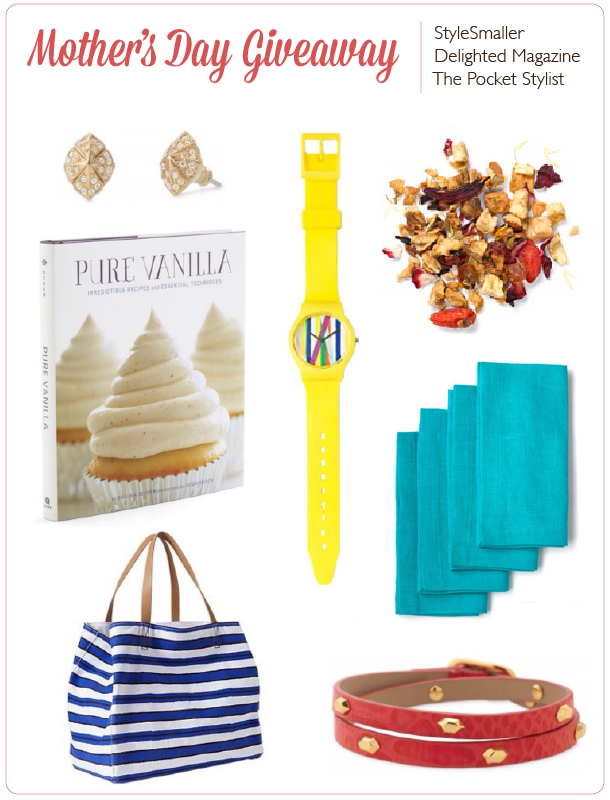
The Pocket Stylist! We found some great products to celebrate the wonderful moms in the world. But let's be honest, anyone would love these items...not just moms, right? And anyone and everyone is welcome to enter! So please do. One lucky winner will receive all of this worth $275!!...

--> Kate Spade Saturday Watch by May 28th
--> $50 Gap Gift Card
--> Stella & Dot Jewelry (Choose an item up to $75)
--> Rufflewood Linen Napkins, Set of 4
--> Pure Vanilla Cookbook
--> David's Tea

Additionally, we're adding a couple goodies for the little girls in your life. Let's just say we're celebrating women and girls in general. :) For your little girl...

--> Hemmed In Maxi Skirt (of your choice)
--> Rufflewood Gingham Tablecloth (perfect for a child's table, 36" square)

Enter here and tell your friends about it too!
1. Sign-up for the giveaway by email or through facebook using the icons below (don't worry, we won't share your email address)
2. Follow us! You get one entry for every follow.


Open to U.S. residents. Contest ends next Friday, May 3.
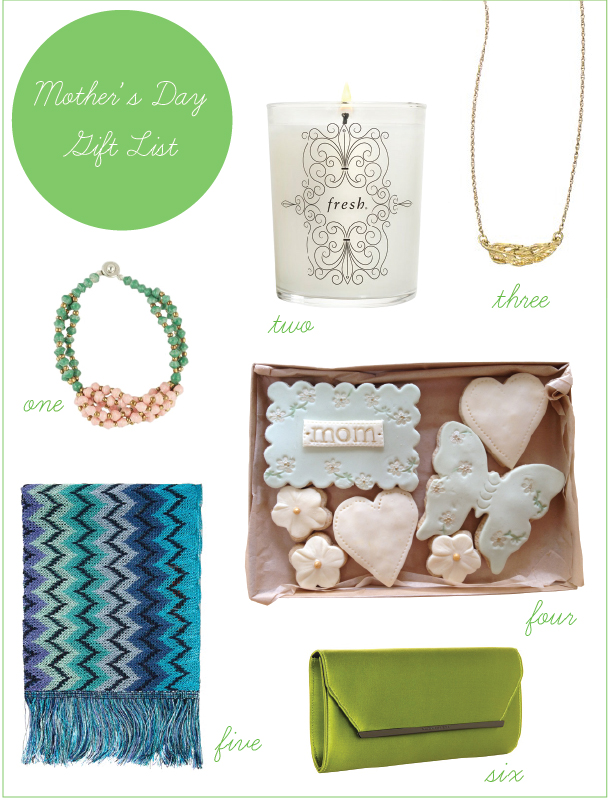
Floral Jewelry DIY

Here's a creative idea from the talented Madeline Trait of

By Madeline Trait

. A great option for giving a friend flowers on May Day (which is next Wednesday!). See the feature in the spring issue of

Delighted

.

SUPPLIES

Flowers  Choose one to two larger blooms and 2-3 smaller flowers or foliage. Be creative and add dried seed pods, feathers, etc.

Glue  Oasis floral adhesive and hot glue

Ribbon  Approximately 1 yard

Heavy Fabric  Canvas or felt should work. You want something that's going to be stiff and hold its shape.

DIRECTIONS

On your fabric, draw a semi-circle shape that is 6-7" wide and not taller than 4". This will be the backing. Try it around your own neck or wrist to be sure it fits well. It should sit just under your collarbone. 

Cut your ribbon into two and tie it to the skinny ends of your fabric. A square not should do. To make sure it holds, add a drop of hot glue to the underside of the ribbon where it touches your fabric backing. This will be your "chain" for your necklace. You can also make the ribbon longer and make a belt out of it or a dog collar for a K-9 friend.

Once you have your backing done, start laying out your flowers and other items on your backing. When you are happy with how it looks, start gluing. Note: floral adhesive can get a bit messy. Try using a toothpick or a small applicator to add glue to your flowers instead of the tube. As you glue the flowers and pods on the fabric, try it on every-once-in-a-while so to ensure it falls correctly on your chest.

Give the flowers a quick spray with water, wrap and deliver! Depending on the flowers you use, your necklace should last a day. If you use flowers that dry nicely, the recipient can dry the piece and wear it all the time! 

Concept and Styling by

Madeline Trait

Photos by

Caroline Winata

Buckwheat Crepes with Rhubarb & Orange Compote


Recipe & Photos by Kathryn Westmore of London Bakes
See full feature in Delighted's Spring Issue

INGREDIENTS
For the Compote
3/4 lb (400 g) rhubarb, chopped into ½ inch pieces
Zest of 1 orange
Juice of ½ an orange
1/4 cup unrefined granulated sugar

Crepes
1 egg
1/2 cup + 2 tablespoons milk
1/2 cup (55 g) buckwheat flour
1 tablespoon of butter
Crème fraîche, to serve

DIRECTIONS
Compote 
1. Put all the ingredients in a pan over a medium-low heat and cook for 20-30 minutes until the rhubarb is soft but still has a little bite to it.  Set aside until needed.
 
Crepes 
1. Whisk together the egg and the milk in a large bowl until combined.  
2. Whisk in the flour until you have a smooth batter. Leave to stand in the fridge for at least 2 hours.
3. When you’re ready to make the crêpes, heat a little of the butter in a small skillet over a medium heat.
4. Give the batter a quick whisk and ladle a spoonful of it into the hot pan. Quickly roll it around to cover the whole pan and cook until browned (about a minute). Flip the crepe and cook the other side. Continue to cook the rest of the batter. You can keep the cooked crêpes in a slightly warm oven to keep them from going cold.
5. Spoon a generous tablespoon of the compote–either warm or cold depending on your preference–into the middle of a crêpe and wrap.
6. Serve with a dollop of crème fraîche and a scattering of orange zest.

Spring Flower Box DIY

Shaleah Soliven of the blog, The Gold Jellybean, created a fun (and cheerful!) DIY to do with your kids! Visit

The Gold Jellybean

for more project ideas...you won't be disappointed.

SUPPLIES

Bright Colored Felt

Yarn

Glue

Small Craft Dowels

Balsa wood

Paint

Block of foam

STEP 1

The first thing to do is create your flowers. The older kids can help with this part, and the younger ones can have fun watching the bright blooms come to life. There are various methods to making felt flowers, and here are just a couple I made. You can get creative with it, using fringed felt strips rolled around your craft dowels or cutting out individual petals and glueing each to a dowel. Heart shaped petals are easy to cutout and make pretty flowers.

STEP 2

I also added a spring bunting to our garden, anchored with yarn pompoms. To make this, I wrapped yarn around a fork about 60+ times, then secured it in the center with string. Tie the looped yarn tightly at it's center. Next, use scissors to cut all the loops, then fluff the yarn to create a ball. Trim any long strands, and finish off by glueing the pompoms to wooden dowels. Add a fun bunting of your choice.

STEP 3

Now it's time to make the box. Starting with the wood, cut pieces to size using your foam block as a guide. Then paint both sides of each piece. Set aside to dry.

STEP 4

While the wood dries, paint the top of your foam green. The idea is to cover the foam with felt flowers and greens, but this paint with camouflage any foam that may peek through. Set this aside to dry as well.

STEP 5

When all the paint is dry, assemble the box. Use glue to adhere each wood side to the foam. Be careful with this step, especially if you’re using hot glue. It’s best the kiddos watch this step.

STEP 6

Once your glue has set, it’s time to roll up your sleeves and get planting! Keep going until you fill your entire planter box with your colorful blooms. The little ones can have lots of fun with this. They can plant, pick, and then re-plant their beautiful flowers!

This feature is in the Spring issue of

Delighted

Photos and concept by Shaleah Soliven of

The Gold Jellybean